3D Drawing
Change the View
View your part from one of six perspectives: top, bottom, left, right, front, and back.
- Choose menu View and click the desired perspective.
Model the Side Views of a Part
- With a part drawn, select View > Model Side Views.
- The side views of your part will be modeled as Comments to Self.
- Note that if your part has bend lines, “Model Bends” will appear instead.
View a Part in 3D
- Choose menu View > 3D.
- Click and drag to rotate and view all sides and features.
- Use the top toolbar in the 3D view to toggle:
- Wireframe/Black & White mode
- Background color
- View orientation
- Transparency
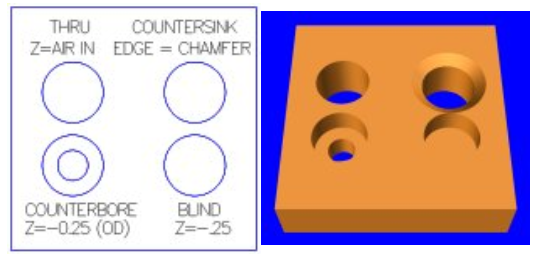
Use the Z-Axis
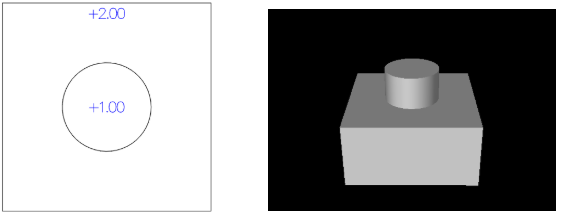
The z-axis represents depth relative to the screen.
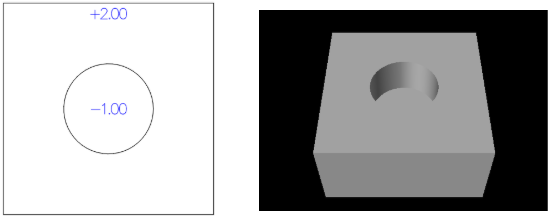
- For each line or shape, click it and in the Z-Control, set a value:
- Positive for a protrusion
- Negative for a recess
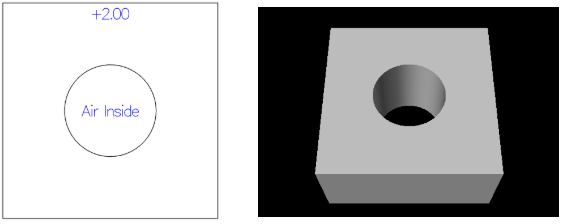
- Air Inside for a through hole
- Positive for a protrusion
- If desired, go to another view, draw features and set z-values appropriately.
Z-Value Tips
- Using z-values for smaller dimensions will often result in lower cost.
- For threading features, the z-value applies to the thread depth/length and must be positive both for protrusions and holes.
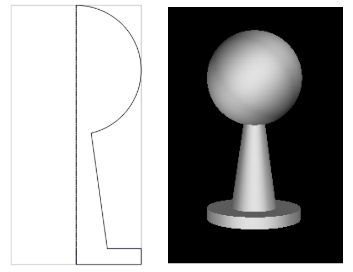
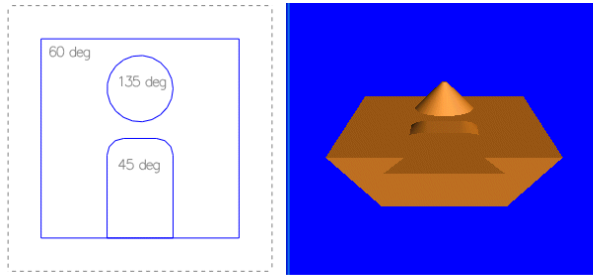
Revolve Feature
The Revolve feature allows you to create symmetrically round shapes.
- Choose menu View > Top.
- Draw a circle, and set the diameter to the largest diameter of the shape.
- In the Z-control, enter the overall length of the shape.
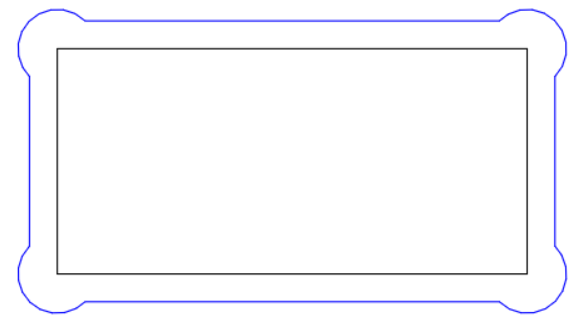
- Choose menu View > Front.
- In the right side of the dotted axis, draw a 2D closed shape that touches 3 sides of the rectangle (see image below).
- Select the drawn shape and choose menu Line > Group.
- In the z-control, set to Revolve.
- To view your revolved shape, choose menu View > 3D.
Set Edge Shape
Edges at holes, cutouts and pockets will default to a sharp 90 degrees. You can specify edge shapes that are chamfered (beveled) or rounded for appearance or functional purposes.
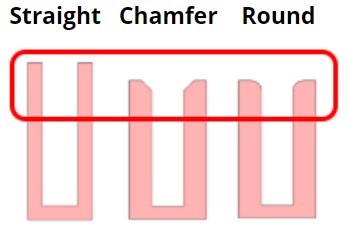
For near edges
- Select a line.
- Check menu Line > Machine > Near Edge >
- Straight
- Chamfer
- Round
- Set desired values.
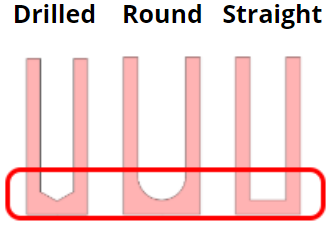
For far edges
- Select a line.
- Check menu Line > Machine > Far Edge >
- Drilled
- Round
- Straight
- Set desired values.
For through holes, if you need to countersink the far edge, use the View menu to switch to the opposite side, and then chamfer the edge from that view.
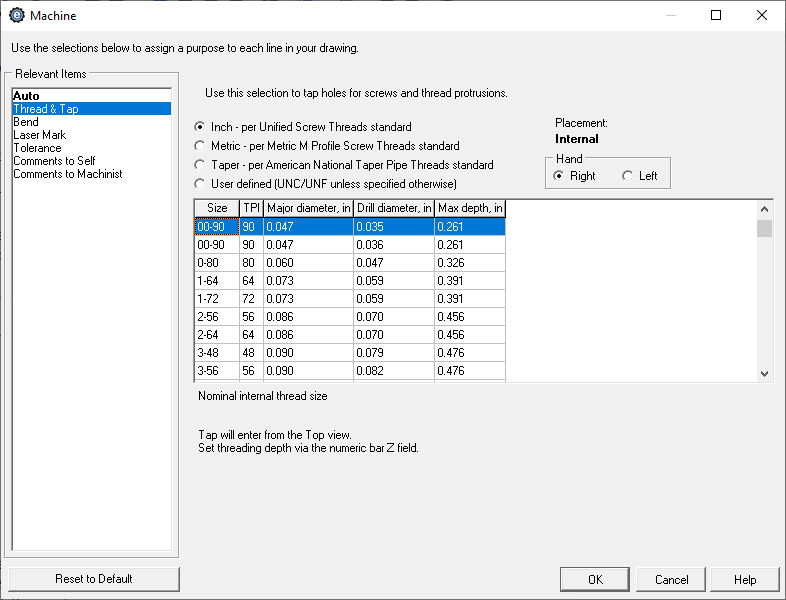
Thread and Tap Features
A tap is a tool for creating internal threads in holes.
You can thread holes or protrusions in your part.
- Select a circle.
- Choose menu Line > Machine > Thread & Tap.
- Check the desired standard of measurement.
- Click the desired thread setting from the size column that fits the intended screw or nut.
- Specify right or left handed threads in the checkbox.
- Click OK.
- In the Z-Control, set the thread length.
User Defined Threads
- In the Thread & Tap dialog, select used defined as the standard of measurement.
- In the size bar, set the major diameter as a decimal value.
- In the TPI bar, enter the number of threads-per-inch.
- Click OK.
- To specify threads not listed in the grid, draw a circle of the minor diameter and use Comments to Machinist to describe the desired thread.
Threading Tips
- If you have both a male and female component, use the same thread specification for each.
- Add tapping and threading in conjunction with the revolve feature by using Comments to Machinist.
- On external threads that end at a larger diameter, it may be necessary to create a groove so that a mating part fits properly.
Add Grooves
Grooves are recesses cut into an inside or outside wall.
- Select a line in the design.
- Check menu Line > Machine > Grooves.
- For each groove, specify the desired dimensions and click Add.
- To edit existing grooves, select one, and click the Replace button. To delete a groove, select a groove and click the Remove button.
Note: For non-rectangular grooves, use Comments to Machinist, or for turned parts use the Revolve feature.
Angled Walls
Angled Walls are walls at an angle other than 90 degrees.
- Select a line or shape.
- Choose Line > Machine > Auto > Side Wall.
- Set the desired wall angle.
- Click OK.
Make Mating Corners
When using a rectangular shape to fit a rectangular recess or hole, the corners must be rounded. Just rounding the corners normally will block insertion and produce an error.
To resolve this, use the mating corners feature.
- Draw and select a rectangle.
- Choose menu Line > Corner > Mate and enter a radius.