Taig Lathe
by Jim Lewis
I’ve been using a Taig lathe at home for more than 10 years now. This page shows the mods I made which make the lathe much more convenient and fast to use.
Most of the mods only save a few seconds but that’s a lot when you consider that using a lathe is performing numerous small steps – most taking only a few seconds. If each step is reduced from 6 seconds to 3 you can do projects in half the time. Or do twice as many projects on a weekend. Or do more sophisticated projects in the time you have available.
| The variable speed Sherline motor is a great upgrade. No more pulley changes and it’s nice to fine tune the exact speed you need. You can go super slow as when using the lathe as a winder or spring maker, etc. The bracket is from the Sherline motor mount (not sure if it is included if you buy the Sherline motor separately). I added the spring to keep tension and I leave the bolts a bit loose. The pulley is easy to make – you just need a V shaped cutting tool. | 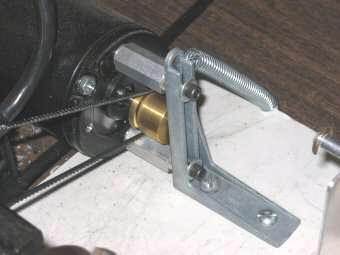 |
| Shows location of Sherline speed control box. | 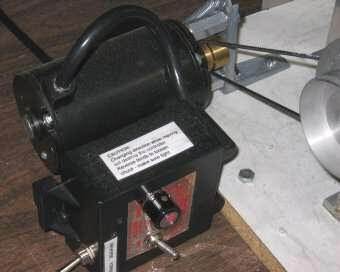 |
| I found I only need one pulley setting with the variable speed Sherline motor. | 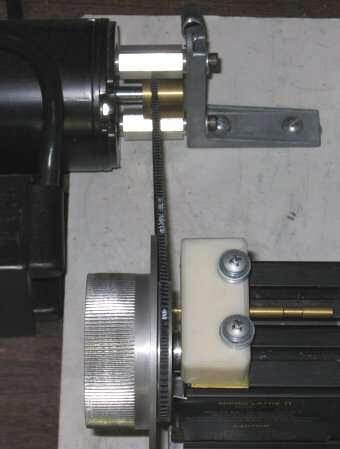 |
| Tailstock shows 4 mods. The keyless chuck is a winner – saves a lot of time. It’s great changing bits with the flick of your wrist. No more fumbling with chuck keys. Got it at Sears. The long handle makes drilling much more comfortable on the hands – just 1/2×1/2″ aluminum stock. The knurled knobs avoid the cumbersome L-keys and also save a lot of time and hassle. | 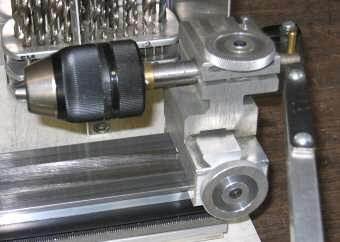 |
| I’ve seen discussions of digital calipers but not many pix. They work great as an inexpensive DRO. And they are not hard to find in the $15-$20 range each. Currently Harbor Freight has them at $15.99. The plastic ones are more than good enough. A simple 1/16″ aluminum bracket holds the caliper. The readout is held on with foam tape (the lateral flexibility of the foam is insignificant). | 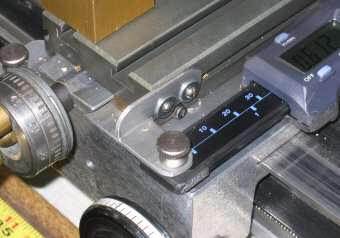 |
| This shows the mounting bracket of the horizontal caliper to the carraige. Just make sure alignment is good so the caliper does not bind when the carraige is close to the readout. | 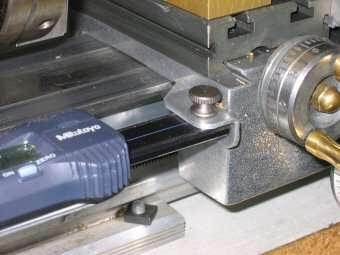 |
| Building a handle onto each toolpost saves the L-key step again – another big time saver. | 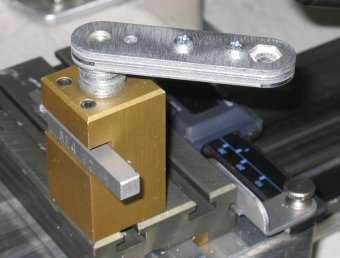 |
| I keep this simple bracket and rod behind the lathe for various winding applications. I’ve used it to wind fishing line to an R/C winch, to make R/C actuator coils, to make electro magnets, etc. | 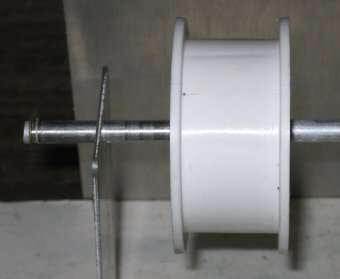 |
|
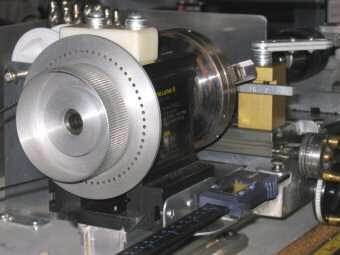
Closeup of the Spindle Grip/Pulley/Indexer (SGPI) and an overview of the lathe. The SGPI is a really nice mod that lets you change the chuck faster and easier and has a 60 position indexer built in – allowing for divisors 2, 3, 4, 5, 6, 9, 10, 12, 15, 20, 30 and 60. The knurled grip makes changing chucks quick and easy. The inside is hollow to minimize mass. Making this part can be a bit tricky due to the large amount of material removed, the ring-shape bore, accurate index holes, etc. I’m considering doing a run of this add-on via eMachineShop. The price would be ~$50 (I don’t plan to include the plastic block or brass pin – both easy to do and you may prefer a different design). Email me (via cust serv) on the contact page if you are interested. Also, I put the CAD file here which you can open with the free emachineshop download. |
 |
| A simple block of plastic and a brass rod complete the indexer locking device. Some rubber under the block allows for fine tuning the pin alignment to the index holes. | 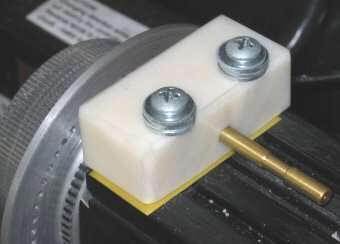 |
KISS Threader
Here is what may well be the world’s simplest threading attachment for the Taig lathe!
It works via a “reference” thread straight down the center. The thread cut will be the same pitch as the reference thread. Keep the hand wheel out to minimize friction and make sure the carriage slides easily on the bed. A close-up of the L-bracket:
I used 1/8″ alum 3003 for the bracket but I would recommend going to 3/16 or 1/4 and perhaps replacing the bend with a bolted L-shape configuration. If you have a lot of 1/2″ square around you could do the entire bracket with several pieces in any of several designs. When you make the L bracket make sure it does not interfere with sliding tool posts onto the left slot.
A nut on the chuck side and at the other end of the spindle attaches the threaded rod. Not seen are simple plastic spacers inside the spindle to center the threaded rod (or use threaded rod that matches the spindle ID).
Ready for internal threading of a nylon workpiece:
The brass bar could be eliminated by tapping the L-bracket directly but then you will be stuck with a single pitch. The brass bar allows for interchangeable pitches by swapping out another brass bar with another reference thread. If you go with the one-pitch-is-all-I-need approach make the bracket out of brass due to it’s better coefficient of friction at the thread.
For the threaded rod I used 1/4-20 x 18″. (A couple of different length threaded rods saves a bit of time taking the nuts on and off. For example you might take a 36″ rod and cut to 16 + 12 + 8.) The rod will bend a bit as you feed the cross slide, or if you prefer, loosen the bracket screws and slide it a bit after each pass.
The approach can do internal and external threading.
If the part does not have a thru hole to allow for the reference threaded rod to pass thru the spindle, proceed as shown below. Chuck the raw stock. Drill and tap a hole for the threaded rod. Affix the threaded rod with a nut against the raw stock. Then machine the part and do any external threading. Finally cutoff the threaded rod hole.
A reversible motor is beneficial. Make sure everything is tight – the nuts on the threaded rod, the toolpost, etc. as you don’t want anything shifting on the final pass.
